It may seem intimidating at first, but learning to set up your snowboard is pretty straightforward and easy to do. Learning to set up your bindings and board will not only save you time and money, but also develop your understanding of how your board works. As you ride, you’ll develop your personal preferences and be able to adjust your setup to fit your needs. So, whether you’re dialing in your first snowboard or just curious about the different setup options, this guide on how to set up your snowboard will help you get out on the snow in no time.
Step 2: Fit Your Bindings to Your Boots
Before you mount your snowboard bindings to your board, you’ll want to set your bindings to your boots.
Adjust the Binding Straps
Check the fit of your boots in your bindings. The center of the binding straps should line up with the center of your snowboard boots when tightened down all the way. If you notice they're not, adjust your binding straps to ensure they secure your boots properly:
- Lace up your boots like normal and place them in the bindings.
Remember: The binding buckles should be on the outside of the foot, so the binding with buckles on the left goes with the left boot and the binding with buckles on the right goes with the right boot.
- Strap your boots to your snowboard bindings. The large strap should sit over the ankle and the small strap should be at an angle over the toe box.
[image]
- Adjust the center of the binding straps to the center of your boot. Remove the small screws on the side of the buckle strap to lengthen or shorten it. Most bindings have tool-less adjustments, but some may need a screwdriver to adjust.
Adjust the Binding Toe Ramp
Adjusting the binding’s toe ramp is an important step to ensure the bindings match the boot’s footprint. This is especially good to do before mounting the bindings to your snowboard. A properly adjusted toe ramp gives you leverage and response as well as additional clearance on deep toeside turns.
How to adjust the binding toe ramp:
- Strap your snowboard boots into the bindings and check how the boot sole lines up with the binding footbed.
[image]
- If the binding footbed and the boot sole don’t line up, adjust the toe ramp so it is in line with the end of your boot. On most snowboard bindings, the toe ramp can slide forward or backward to adjust to your boot length.
- With the boots in the binding, check the bindings on your snowboard and confirm that the toe and heel of the boot don’t hang too far over the edge. Ideally, your boots should hang 1 to 2 cm off the board.
Adjusting Forward Lean
The last binding adjustment to address is the forward lean of the highback, the piece behind the boot against the back of the rider’s calf. A greater forward lean creates a more aggressive stance, causes your knees to bend, and increases power transfer and precision on the heelside edge. For most beginner snowboarders, it’s best to start with zero forward lean, which is more forgiving and less taxing on your legs. Once you get the basics down and develop your own preferences, you can adjust and try different degrees of forward lean.
Adjusting the binding's forward lean is simple:
- On the outside of the highback look for a lever, dial, or screw to adjust the angle of the highback. Some snowboard bindings may require a tool to make the adjustment.
Step 3: Determine Your Snowboard Stance
Your snowboard stance is the placement of your feet on the board. It’s one of the most important parts of setting up your snowboard. When determining your stance, you’ll need to determine your stance direction, stance width, the angles of your binding, and your binding’s setback.
Choosing Stance Direction
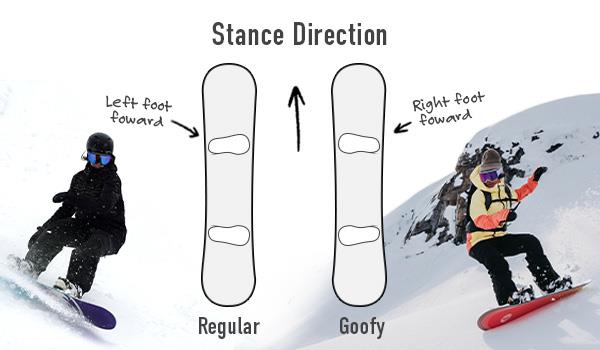
You’ve probably heard this before: Are you regular or goofy?
Regular or goofy refers to your stance direction and which foot is forward. Regular stance is with your left foot forward and your right foot back. Goofy refers to your right foot forward and left foot back. Most riders have their more dominant foot at the back to control steering, while the front foot works on balance.
If you’re not sure which is your lead foot, here are a few ways to figure it out:
- Slide on a smooth hardwood or tile floor. Whichever foot is in the front is most likely the front foot of your snowboard stance.
- The push test: Ask a friend to stand behind you and give you a gentle push forward. Whichever foot you naturally put forward to stop your fall is most likely the front foot of your snowboard stance.
- The stairs test: Walk up a step or two. Whichever foot you start with is most likely your dominant foot and should be in the back of your snowboard stance.
Ultimately, as you get snowboarding, you’ll find your personal preference and be able to adjust your stance accordingly.
Determine Your Stance Width
Stance width refers to the distance between your snowboard bindings. Your stance width impacts your comfort, balance, and the responsiveness of your board. As a beginner snowboarder, it’s a good idea to start your stance width slightly wider than shoulder width. Many boards have a reference stance specific to that snowboard to indicate the optimized stance for that board. So if you’re unsure, that’s a good place to start. If you’re struggling with balance, try a wider stance. If you’re having trouble initiating turns, think about narrowing your stance width. Like many things about your snowboard setup, the more you ride, the more you’ll learn how your board responds under your feet, and you'll develop your riding preferences.
Pick Your Binding Angles
Snowboard binding angles refer to the position and orientation of your bindings on your board. Your snowboard binding angles directly affect your power transfer, edge control, and overall comfort while riding.
Binding angles are measured in degrees, either positive or negative. Zero degrees is neutral, meaning your binding is mounted straight across, perpendicular to your snowboard. Positive angles turn your toes towards the nose or front end of the board, while negative angles turn them toward the tail (back). When riders refer to binding angles, the first number refers to the front foot and the second to the back. For example, +12,-3 means the front foot is angled 12 degrees towards the front of the board, and the back foot is angled 3 degrees towards the rear.
Most riders prefer their front foot to be angled around +15 to +21 degrees towards the nose of the board. Racers or riders who prefer a more surfy style usually like a greater angle, +21 degrees or more, for a more open stance. The back binding angle varies based on your riding style—it might be set at zero (neutral) or tilted slightly forward or backward.
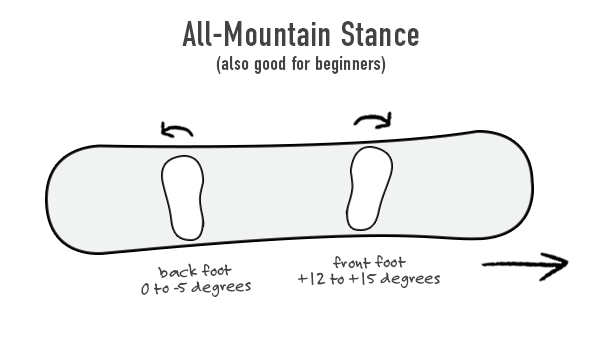
If you're new to snowboarding or an all-mountain rider, a great beginner snowboard setup is +12 to +15 degrees for your front foot and 0 to -5 degrees for your back foot. This stance gives you stability, versatility, and comfort across different terrain types.
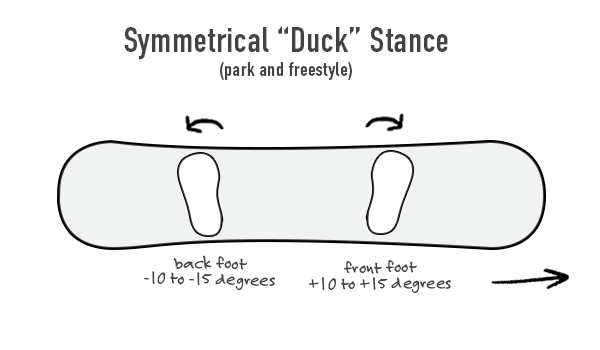
Freestyle snowboarders and park riders often prefer a duck stance, a symmetrical setup with +10 to +15 degrees on the front foot and -10 to -15 degrees on the back. This stance allows equal comfort riding regular or switch (backwards) and provides balance for jumps, spins, and tricks.
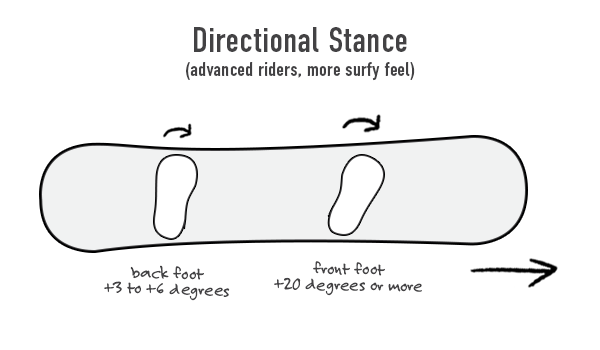
More advanced snowboarders might choose a directional stance, with both binding angles set to positive degrees, facing the nose. This type of stance is ideal for carving on groomed runs and provides aggressive edge control, although it can reduce mobility in rough terrain or while landing jumps since it limits hip movement.
Ultimately, your snowboard binding angles come down to personal preference. Small adjustments can significantly change how your board feels and responds. Don’t be afraid to experiment.
Setback
Setback refers to how close the bindings are to the tip or tail of your snowboard. Some snowboarders prefer the bindings set to the dead center of the board, especially park riders, since this creates a symmetrical feel when riding forward and switch (back foot forward). Most all-mountain riders have their bindings slightly back from center, at the board's recommended location. This helps with turn initiation and keeps the nose of the board up rather than getting stuck digging into the snow. Powder riders tend to set their bindings even further back to open up the nose, allowing for more flex and more float in lighter snow.
Refer to your snowboard’s reference points as a starting point, and as you ride, experiment with some slight adjustments to find your personal preference.